Activity Knits & Crafts, Original Knitting Patterns

Beta: a chalk bag knitting pattern for rock climbers!

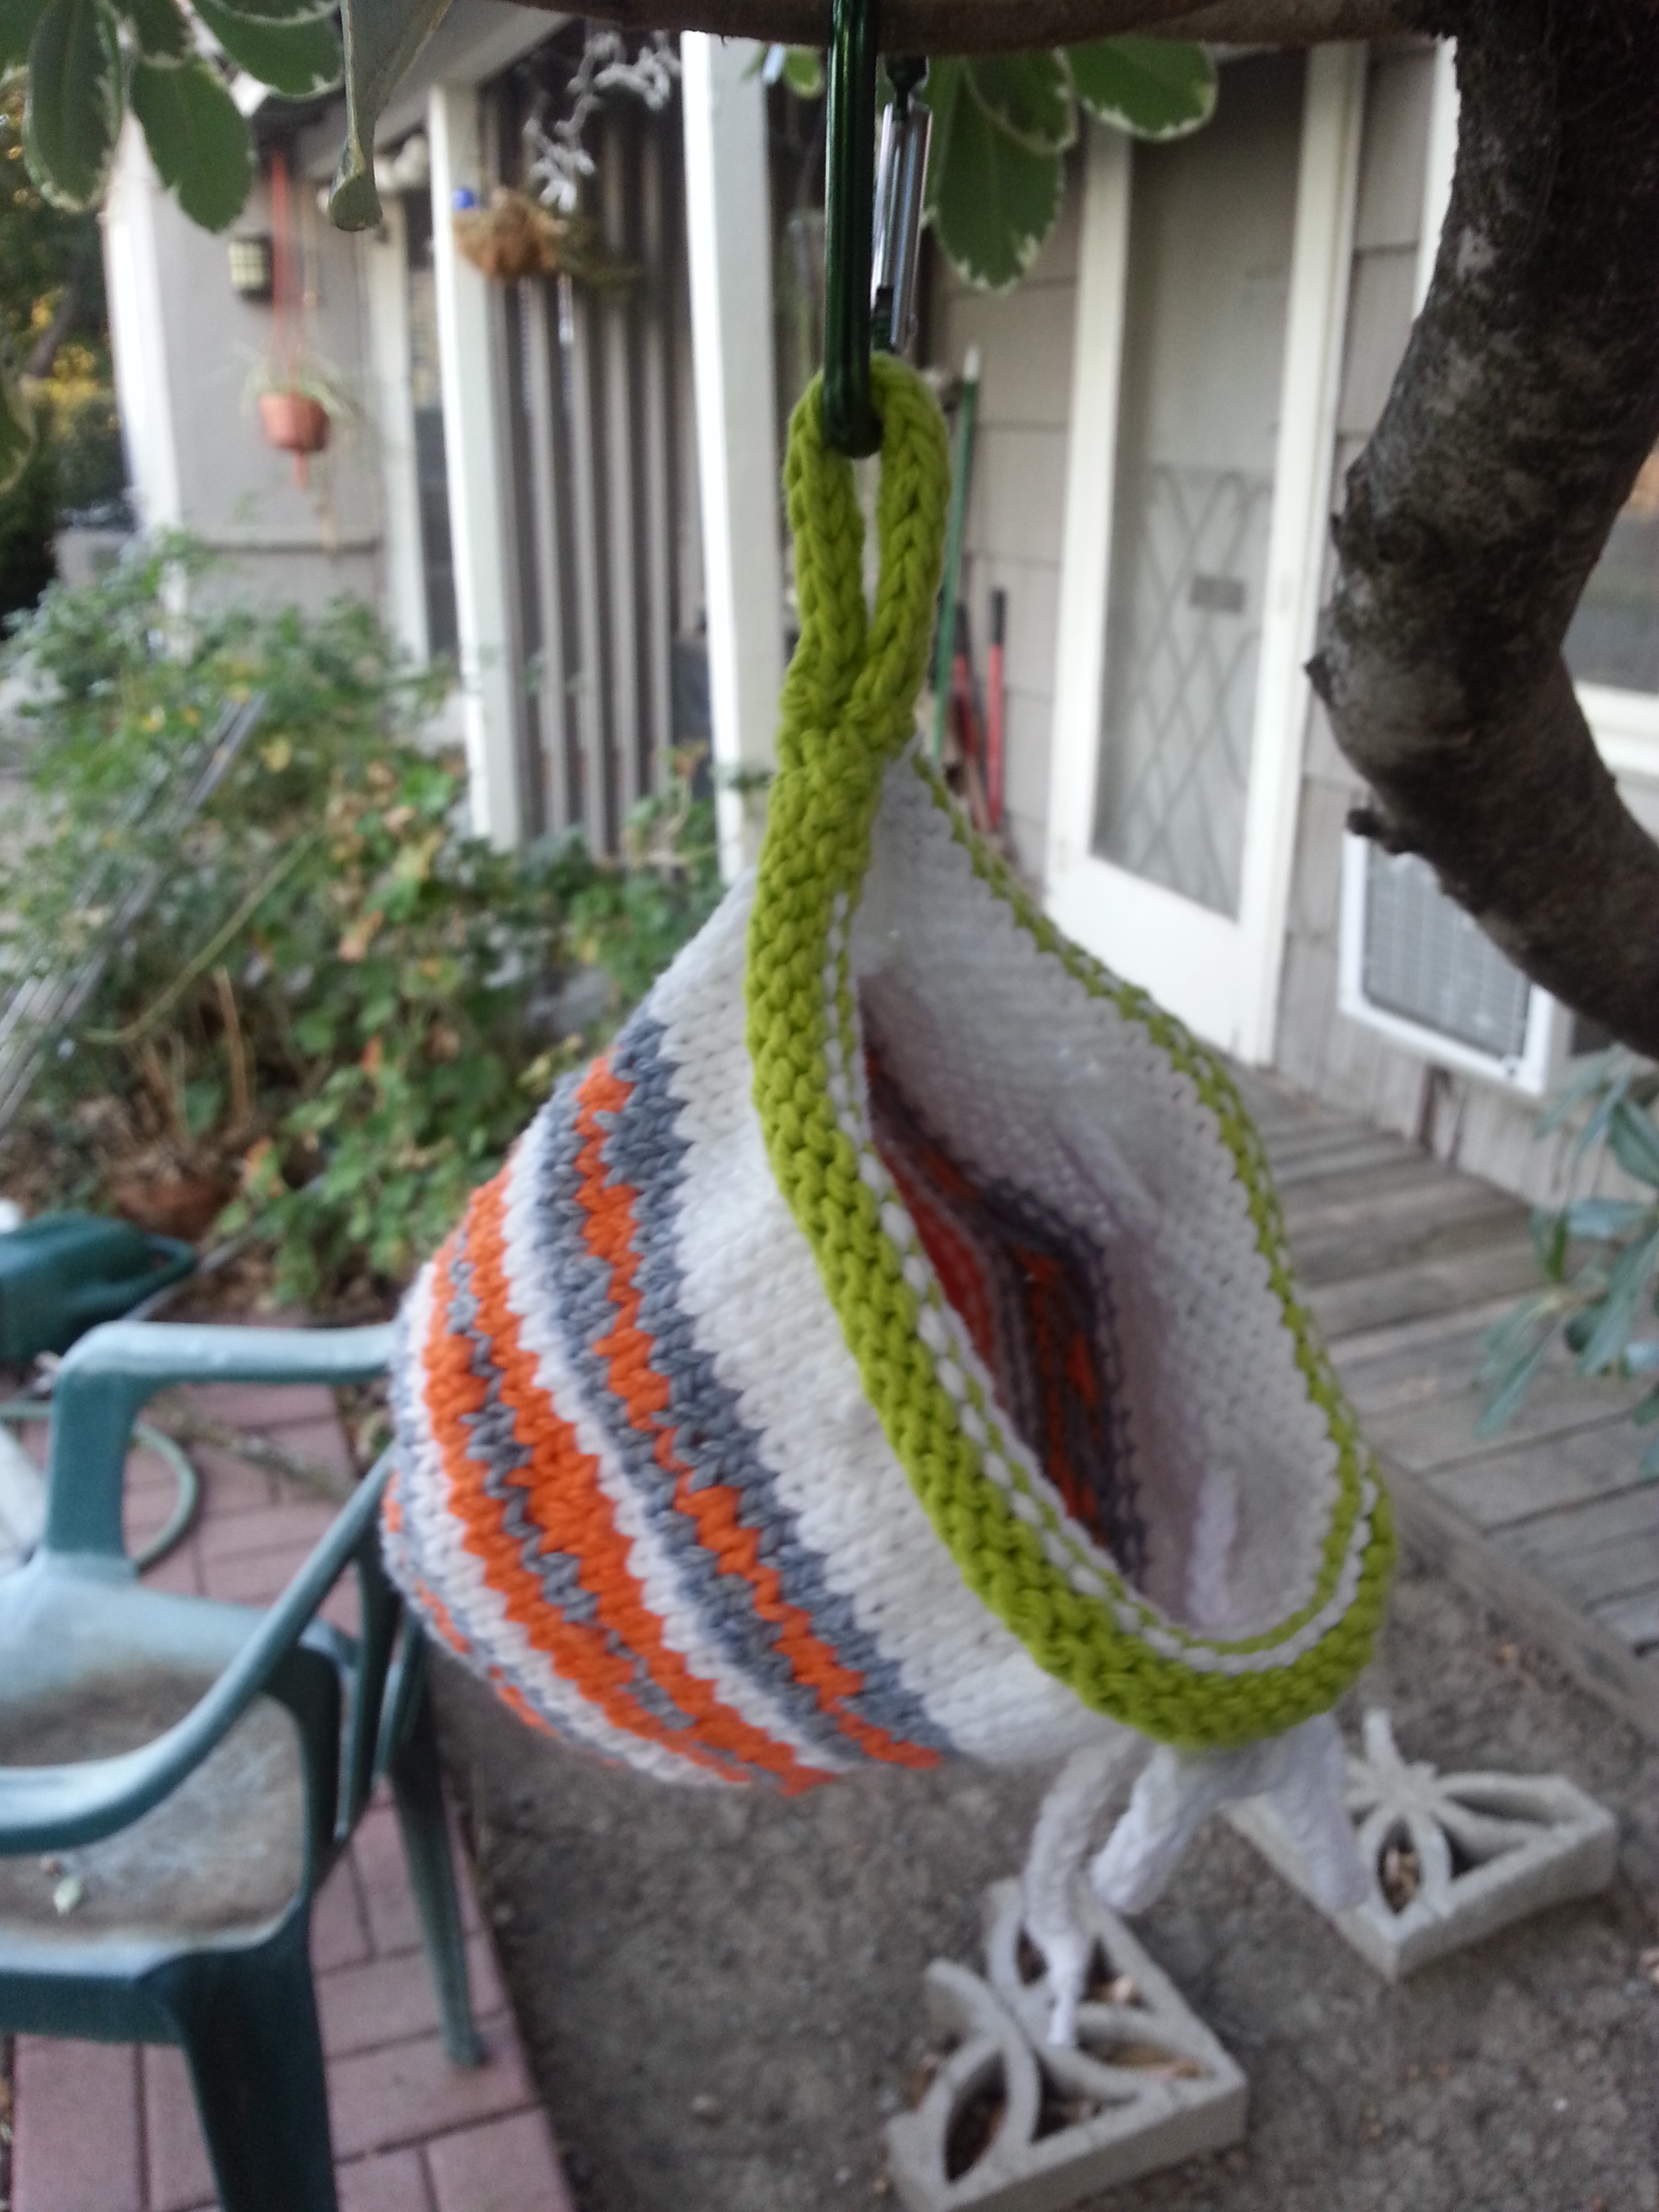
As promised, I have a new free pattern in my series of activity-related knitting. Last time it was a pattern for a colorful yoga mat bag. This time it’s pattern to make a uniquely colored chalk bag for rock climbing! Introducing, Beta:

2014-01-14 16.31.09

I tried rock climbing for the first time ever in a climbing gym about seven months ago. I was amazed at how much I liked it, and I’ve climbed there almost every week since June. I never thought of climbing as my kind of activity, but I love that it is both a mental and physical challenge. (A side benefit of the latter is that I have actually have some upper body strength now!)

2014-01-14 21.06.22

One of the things that climbers often have on their person is a chalk bag, as chalk can help you get a better grip on holds when your hands start to get sweaty. After seeing someone who had a crocheted chalk bag at the gym (she received it as a gift and didn’t know how it was made), I decided I had to knit my own. I also decided that it should match the other gear I use while top roping. So I wrote a pattern that incorporates the colors of my belay device, harness, and shoes, AND for good measure, loosely mirrors the pattern on the strap of my particular harness ( this one by Mammut) with stranded colorwork. You can kind of see all this in the photo above. Here’s a lovely (blurry) action shot of me “chalking up” with my new chalk bag:

2014-01-14 20.32.49

In climbing terms, ‘beta’ usually refers to descriptions of or advice about a particular route. I thought it was a fitting name for a knitting pattern like this one. I don’t expect that many people will want to replicate the exact colorwork that I have done, because it is so tailored to my climbing gear. But you can use this pattern as advice for how to make a chalk bag in whatever style and color you want.

[EDIT: I almost forgot to include some “in progress” pics!]

2013-12-29 11.07.052013-12-29 13.44.56

The only thing I don’t have good advice on is how much yarn you need, because I used leftovers from the Bernat Handicrafter Cotton that I had from making the yoga mat bag. I would guess that since skeins are 80 yds/50g each, to be on the safe side you’d want to have about 1/2 skein of white, 1/3 skein each of orange and grey, and 1/4 skein of green, but I did not measure or weigh my yarn so I am truly guessing. In the future I will try to take notes!

2014-01-14 16.31.22

I’m going to post the whole pattern below, but for the first time ever I have made a pattern into a free ravelry download, so if you are on ravelry, you can get the pattern there as well, and  post your own finished version!

Beta: A climber’s chalk bag pattern
Yarn: Worsted weight cotton yarn in white, green, gray, and orange
(this version was made with Bernat Handicrafter Cotton)
Materials:
One set of double pointed knitting needles, size 4
Yarn needle
Optional: stitch marker for start of round
Gauge:
18 stitches and 26 rows= 4 in. square.
Gauge is not super important as long as you can fit your hand inside the bag.
Chalk bag pattern
Cast on 56 stitches in green, divide onto four needles (14 stitches on each)
Round 1-4: knit
Rounds 5-8: switch to white, knit
Round 9: (k6, yo, k2tog), repeat to end of round
Rounds 10-13: knit
Colorwork section:
Rounds 14-21: Work Chart 1.
Chart 1
Chart 1

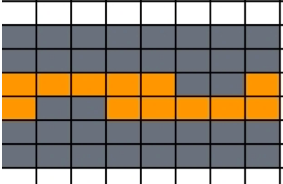
Rounds 22-29: Work Chart 2.

Chart 2
Chart 2
Rounds 30-37: Work Chart 1 again.
Decrease section:
Round 38: with white, knit
Round 39: (k2tog, k1) repeat until last two stitches remain, k2tog
Round 40: knit
Rounds 41-46: Repeat rounds 39 and 40 three times
Round 47: k2tog all around
At this point you should have about 6 stitches remaining.
Break yarn leaving a long tail, pull through remaining stitches. Weave in ends.
I-cord closure
With white yarn, cast two stitches onto a double pointed needle
Knit across, but do NOT turn. Slide stitches to the other point of the needle
Repeat until I-Cord is the desired length, approximately 30 inches.  Cast off.
Weave through the yarn over holes.
I-cord carabiner loop
Cast on 4 stitches in green, leaving a long tail (8-10 inches) for sewing
Knit an I-cord as for closure
When I-cord is 3 inches long, cast off stitches leaving another tail of yarn.
Using yarn needle, sew tails of yarn into the bag at the desired location.
 Liner options:
If you sew, you can make a fabric lining for the inside of the bag and stitch it in place. Otherwise, putting a zip closure plastic baggie inside or using a chalk ball will minimize the amount of chalk that falls out. A tighter gauge will also help loose chalk remain inside.

2014-01-14 16.32.42

 If you prefer written instructions to charts, I’ve typed them up below:
Chart 1 written out:
Round 14: knit
Rounds 15-16: switch to gray, knit
Round 17: (k1 orange, k2 gray, k5 orange), repeat to end of round, carrying floats in back
Round 18: (k5 orange, k2 gray, k1 orange), repeat to end of round, carrying floats in back
Rounds 19-20: with gray, knit
Round 21: switch to white, knit
 Chart 2 written out:

Round 22: knit

Rounds 23-24: switch to orange, knit

Round 25: (k5 gray, k2 orange, k1 gray), repeat to end of round, carrying floats in back

Round 26: (k5 gray, k2 orange, k1 gray), repeat to end of round, carrying floats in back

Rounds 27-28: with orange yarn, knit

Round 29: switch to white, knit

Abbreviations used:

k = knit,  yo =yarn over, k2tog =knit two together

As before, you must ask my permission before reproducing any of the content here, and when you do, cite me as the source!

2014-01-14 21.06.49

Happy Climbing!

Historical Knits & Crafts

Knitting for Victory! (free knitting patterns included!)

knitting and history

[UPDATE: I posted even more patterns from this historic knitting book here in 2013!]

Today is Veterans Day and it is also the 1 year anniversary of when I started this blog. So this post will combine two things I love: history and knitting. With free historic knitting patterns, no less!

As I wrote about in my very first post, what we in the United States call Veterans Day is known to Europe, Canada and most of the world as Remembrance Day. This year we’ll observe the holiday on Monday, but the actual date is the eleventh because Nov. 11 1918 was Armistice day—the day that World War I ended. The United States lost maybe about 100,000 or so soldiers in the Great War. European countries lost millions.

The  Great War, as it was then known, started in 1914, but the U.S. did not join until 1917. During the years the U.S. was at war, the government and other support organizations asked Americans to help the war effort. One of the ways they were asked to contribute? Knitting!

Socks were important in bad weather and trench warfare situations. Sweaters, wristlets, scarves and hats were also in demand. This website does a pretty good job of explaining some of the history about the wartime knitting effort if you want to know the details. I noticed that the article on the website cites a book called No Idle Hands: The Social History of American Knitting, if you want to know even more about knitting history.

Even though I knew about the knitting aspect of WWI, I never really thought much of it. That is, until I came across this book for $2 at my local thrift store:

I knew it was old when I first picked it up, but I was shocked when I discovered that it was from 1918!  What a find! The very first section of the book is all patterns to knit for soldiers. The rest of the book includes a bunch of crocheting and knitting patterns. Some of the patterns will probably never be fashionable again, but many of them are still rather stylish by today’s standards. And from what I can tell, they’re no longer in copyright. So without further ado, I present to you my favorite knitting patterns from 1918!

1918 knitting patterns

First off, of course, is “service wear,” or knitting patterns for soliders. Most of these are so basic as to barely need a pattern (like the garter stitch scarf). But a few caught my attention.

Helmet

First of all—look at those illustrations behind the model! As for the pattern itself, this looks thoroughly practical—it covers your head and a lot of your face, and has the scarf like parts to keep the rest of you warm. Also, it goes well with a hat.

Service Sweater Type ‘C’

Once again, the illustration really catches my eye. But I also like this design—a cardigan with three pockets, which I feel like I haven’t really seen before. This pattern also has this paragraph underneath it which begins with the sentence “Since 1914 The Fleisher Yarns have been in active service on the battlefields of Europe.”

Meta and Dexter caps

Ok, I know what your thinking—the names of these hats have certain pop culture associations now that they certainly never intended! Nevertheless, I think these hats could be conceived as fashionable today, though maybe minus the crazy huge bow on “meta.” Pretty much all of the hats in the book are crocheted, and these are no exception.

Marcelona Jacket

I was surprised at just how many crochet patterns I actually liked in this book. Normally I don’t care as much for its appearance and thickness, but I think it works with this jacket. I also like the wrap around effect.

Rivoli Sweater

This is probably my favorite of all the knit sweater patterns. It’s a fairly simple pattern but I love the overall effect. I’m not sure why this pattern has a separate page for the construction and dimensions of the sweater, because few of the patterns have this diagram. But it looks helpful.

Pensacola sweater

This is my other favorite sweater pattern. I really like the fit and the way the buttons are placed. I also like the idea of the cuffs, even though I’m not sure if I would use angora for them. I’m also not exactly sure how the snaps are incorporated.

EDIT: You can now see what this sweater looks like when made by a modern day knitter! Check out this post at knitthehellout. For more knitting details, see Cassy’s ravelry project page for Pensacola.

I really hope that I will have the chance to attempt one of these patterns someday! More than that, I hope that others out there can use these patterns to make something. Reading through the directions, I realize that there are some hurdles to actually re-creating these garments for yourself. The first is that there is only one size given for each pattern, and there’s not a lot of info on the finished dimensions (except on the rivoli sweater). The second is trying to figure out needle sizes and yarn types and amounts. There is a kind of visual knitting gauge in the book that I’m posting below because it seems helpful, and there is a list of the kinds of yarns and some descriptions that is less helpful:

One thing the patterns do provide? Gauge. I think that if you used the gauge, figured out a relatively similar yarn type by comparing it to the list, and then overestimated the yardage it would take, I think it would be possible. If anyone wants to try these patterns, I’d love to hear how they turn out!